
Building Modern APIs with Docker, NestJS, MongoDB, and Mongoose: A Comprehensive Guide for Developers


What is Docker?
Docker is an open-source platform that enables developers to build, deploy, and run applications in isolated containers. Containers are lightweight, portable, and self-contained environments that can run on any machine, making it easy to create and manage applications across different environments. With Docker, developers can package their applications and dependencies into a single container, which can be easily deployed to any infrastructure, from local machines to cloud servers. This makes it an efficient and reliable tool for software development, testing, and deployment.
What is NestJS?
NestJS is a progressive Node.js framework for building efficient, scalable, and maintainable server-side applications. It is built with TypeScript and uses modern programming concepts such as Dependency Injection, Decorators, and Pipes to provide a modular architecture and robust code structure. NestJS provides out-of-the-box support for web frameworks such as Express and Fastify, and can be used to build APIs, microservices, and full-stack web applications. It also has a vibrant community and an extensive library of plugins and modules to enhance developer productivity.
What is MongoDB?
MongoDB is a high-performance, open-source NoSQL database that provides a flexible and scalable data storage solution. It stores data as collections of JSON-like documents, which allows for fast, efficient, and dynamic data processing. MongoDB's dynamic schema, indexing, and querying capabilities make it a powerful and flexible tool for data management, and its horizontal scalability makes it well-suited for handling large distributed datasets. Additionally, MongoDB has a rich ecosystem of drivers, tools, and cloud services that make it easy to develop and manage applications at scale.
What is Mongoose?
Mongoose is an elegant and intuitive Object-Document-Mapper (ODM) for Node.js and MongoDB. It provides a rich set of features, including a simple and flexible schema definition, a fluent query API, middleware hooks, and support for data validation and business logic. With Mongoose, developers can model their application data using JavaScript objects and leverage MongoDB's flexible document-based data model. This makes it easier to work with data in Node.js applications and simplifies the process of defining data structures and interacting with MongoDB databases.
Let’s get started!
Setting up your Docker machine locally.
For the local configuration of Docker, kindly refer to the relevant setup guide based on your operating system.
Windows: https://docs.docker.com/desktop/install/windows-install/
Mac: https://docs.docker.com/desktop/install/mac-install/
Linux: https://docs.docker.com/desktop/install/linux-install/
Once we are done setting up our Docker we can now proceed with setting up our NestJS application.
Setting up your NestJS application
After completing the Docker setup process, we can proceed with configuring and installing our NestJS application. Assuming you have installed NodeJS / Git on your local device.
Installation:
To commence the project setup, there are two available options: utilizing the Nest CLI to scaffold the project or cloning a starter project, both of which will yield equivalent results.
However, in order to fully leverage the Nest CLI's capabilities and enable generation functionality, it is strongly recommended to install the Nest CLI.
$ npm i -g @nestjs/cli
$ nest new project-name
Alternatively:
$ git clone <https://github.com/nestjs/typescript-starter.git> project
$ cd project-name
$ npm install
To run the application:
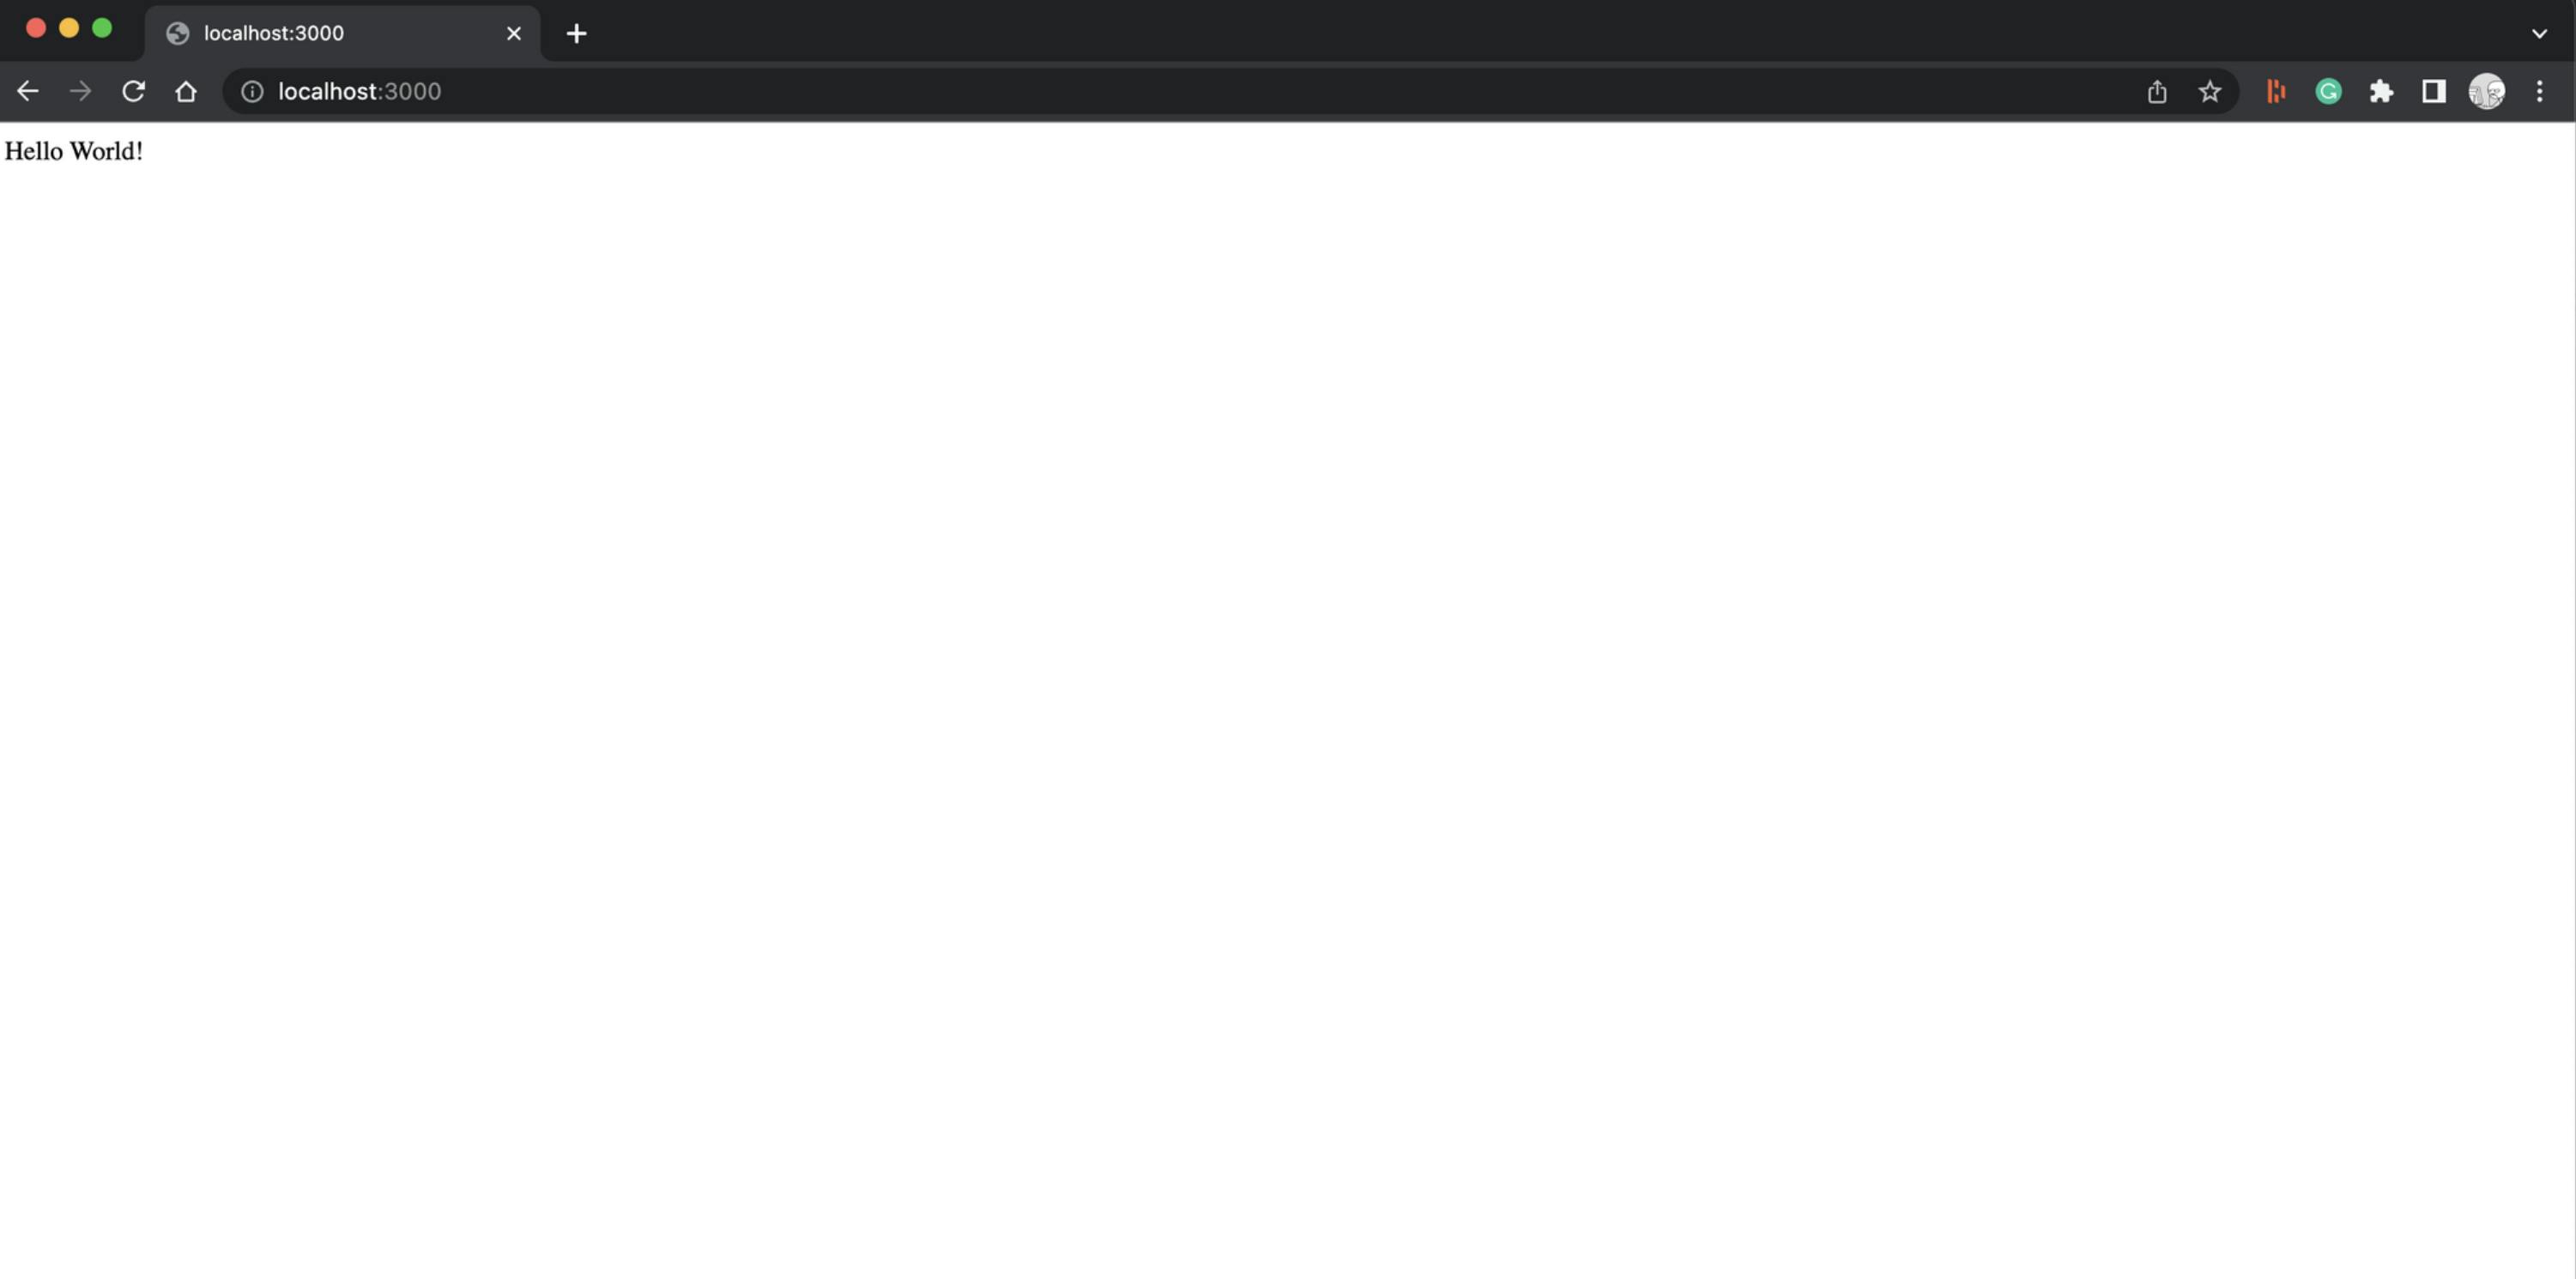
$ npm run start
Hooray! our application is now up and running in port 3000.
Setting up our MongoDB
When it comes to setting up our database, we have a couple of different options to choose from. The first is to install MongoDB on our local machine or to host it on our own platform. Alternatively, we can use the MongoDB Atlas cloud-based database service, which offers a range of features and benefits.
For the purpose of this guide, we're going to use MongoDB Atlas' free tier, which provides us with everything we need to get started. To begin, we need to create an account on the MongoDB Atlas website. Don't worry, it's a quick and easy process, and you can get started right away by heading to the following URL: mongodb.com/atlas/database.
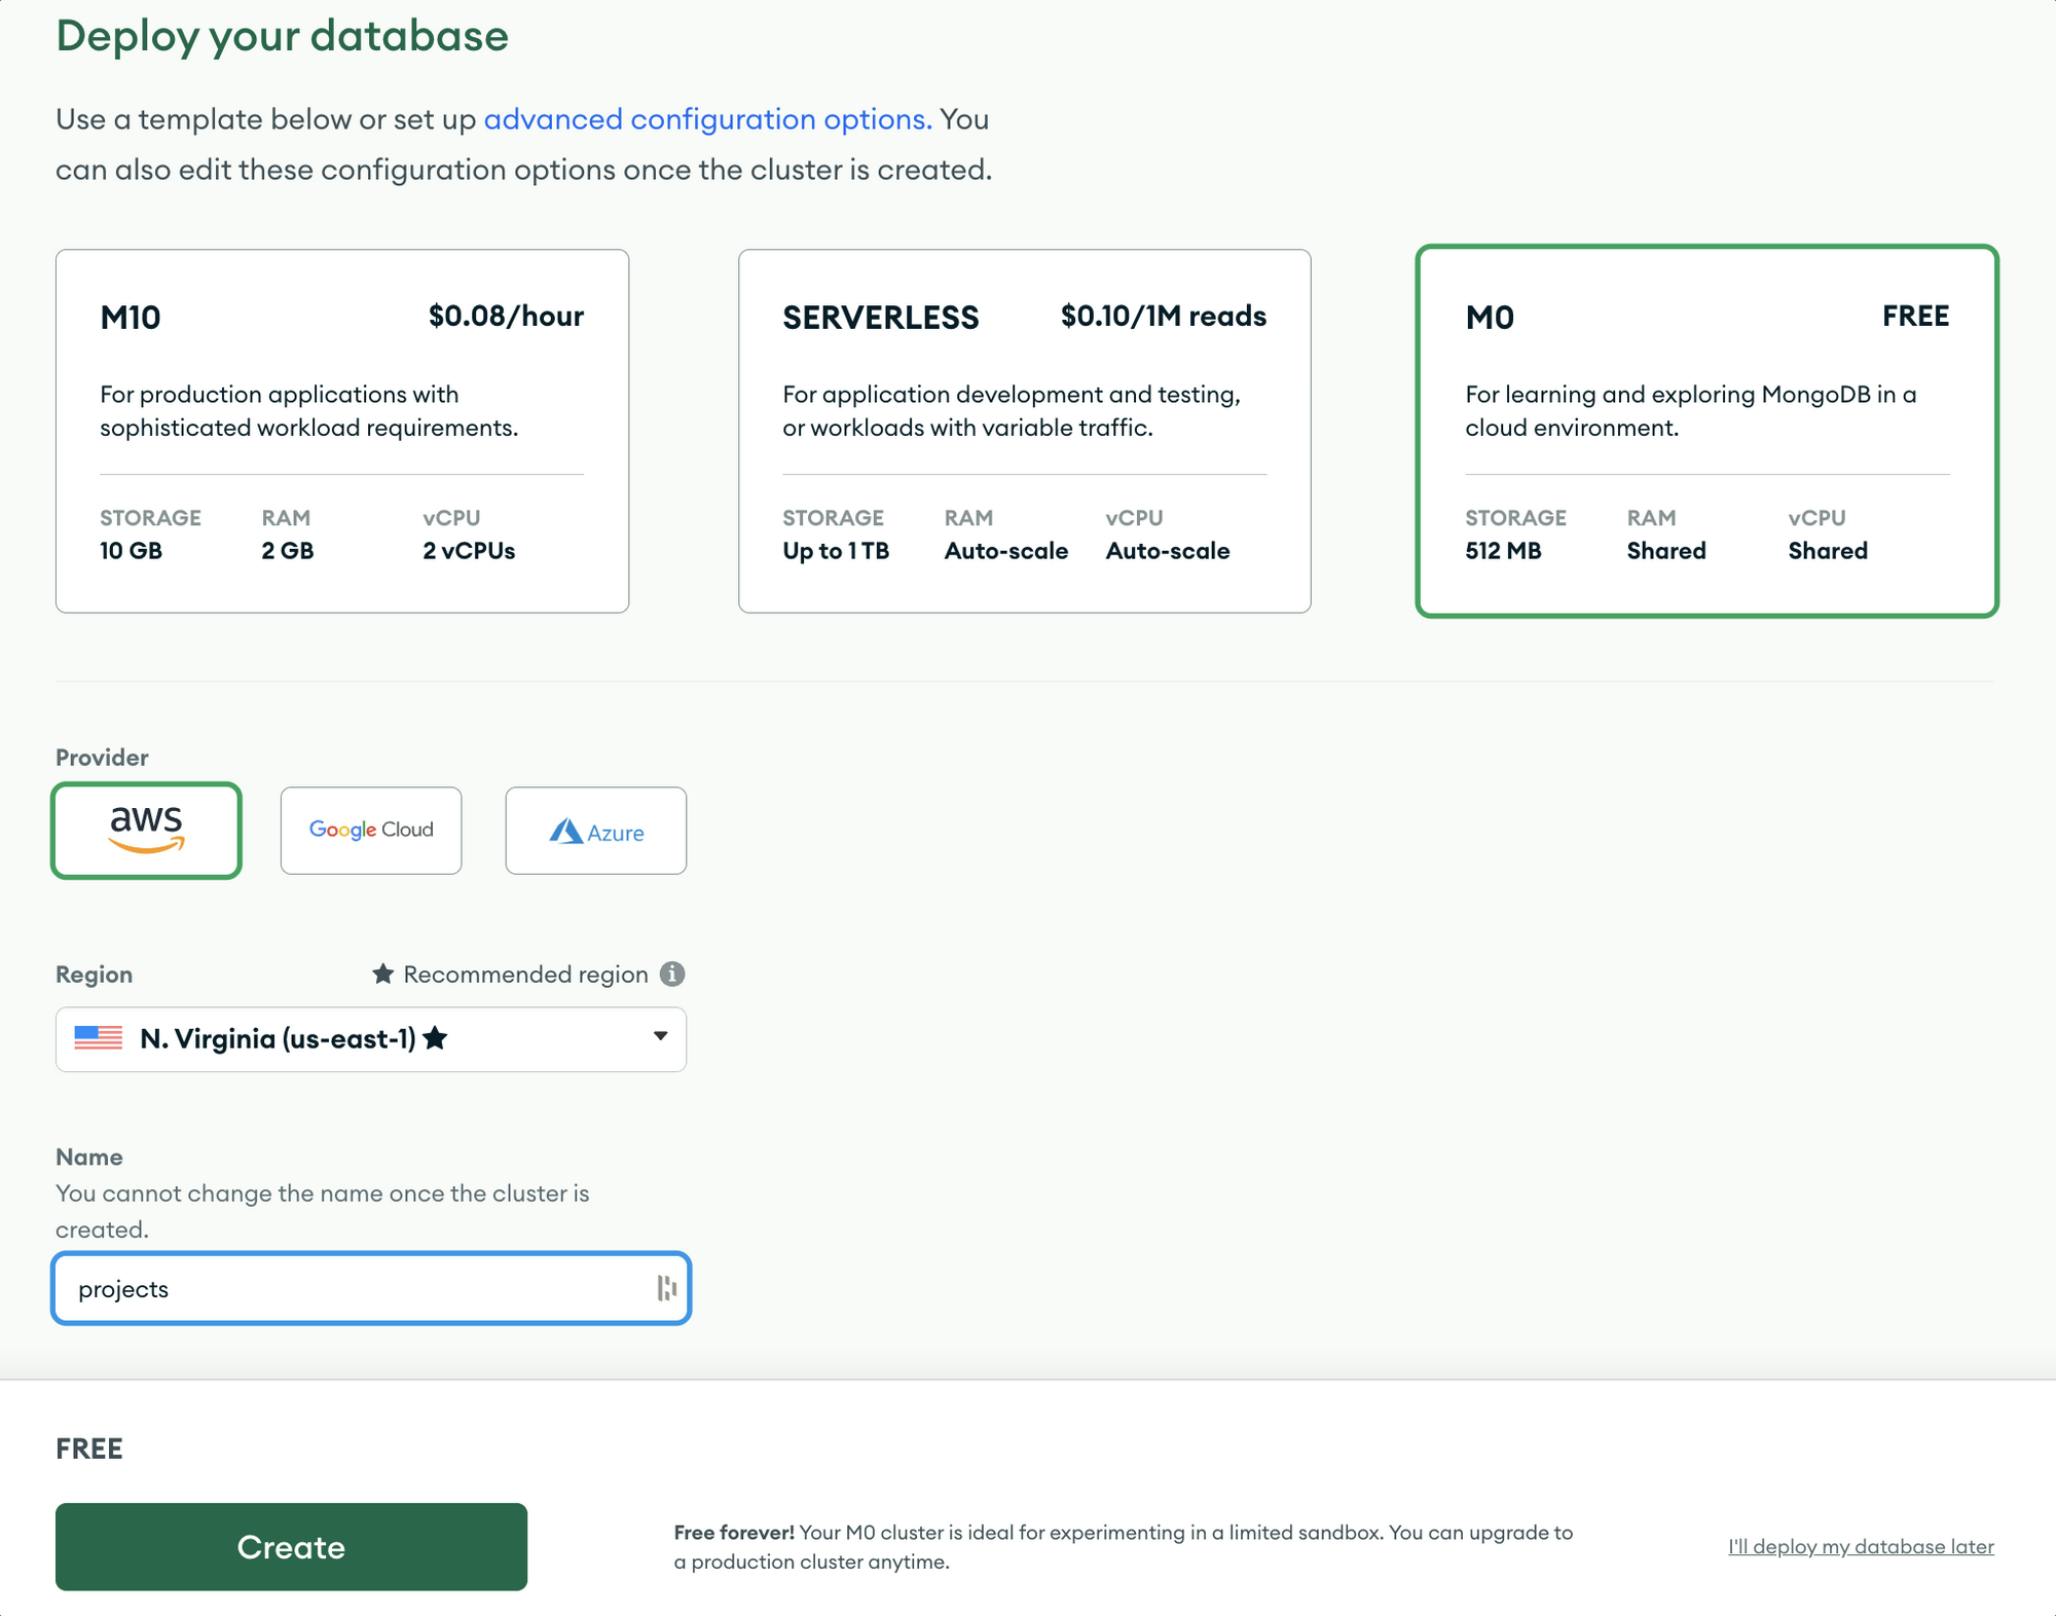
Once we are all done signing up, Let’s create our database by clicking “Build a Database”.

Let’s create our database, for this discussion we can use M0 and name our cluster projects.
Setting up our account configuration.
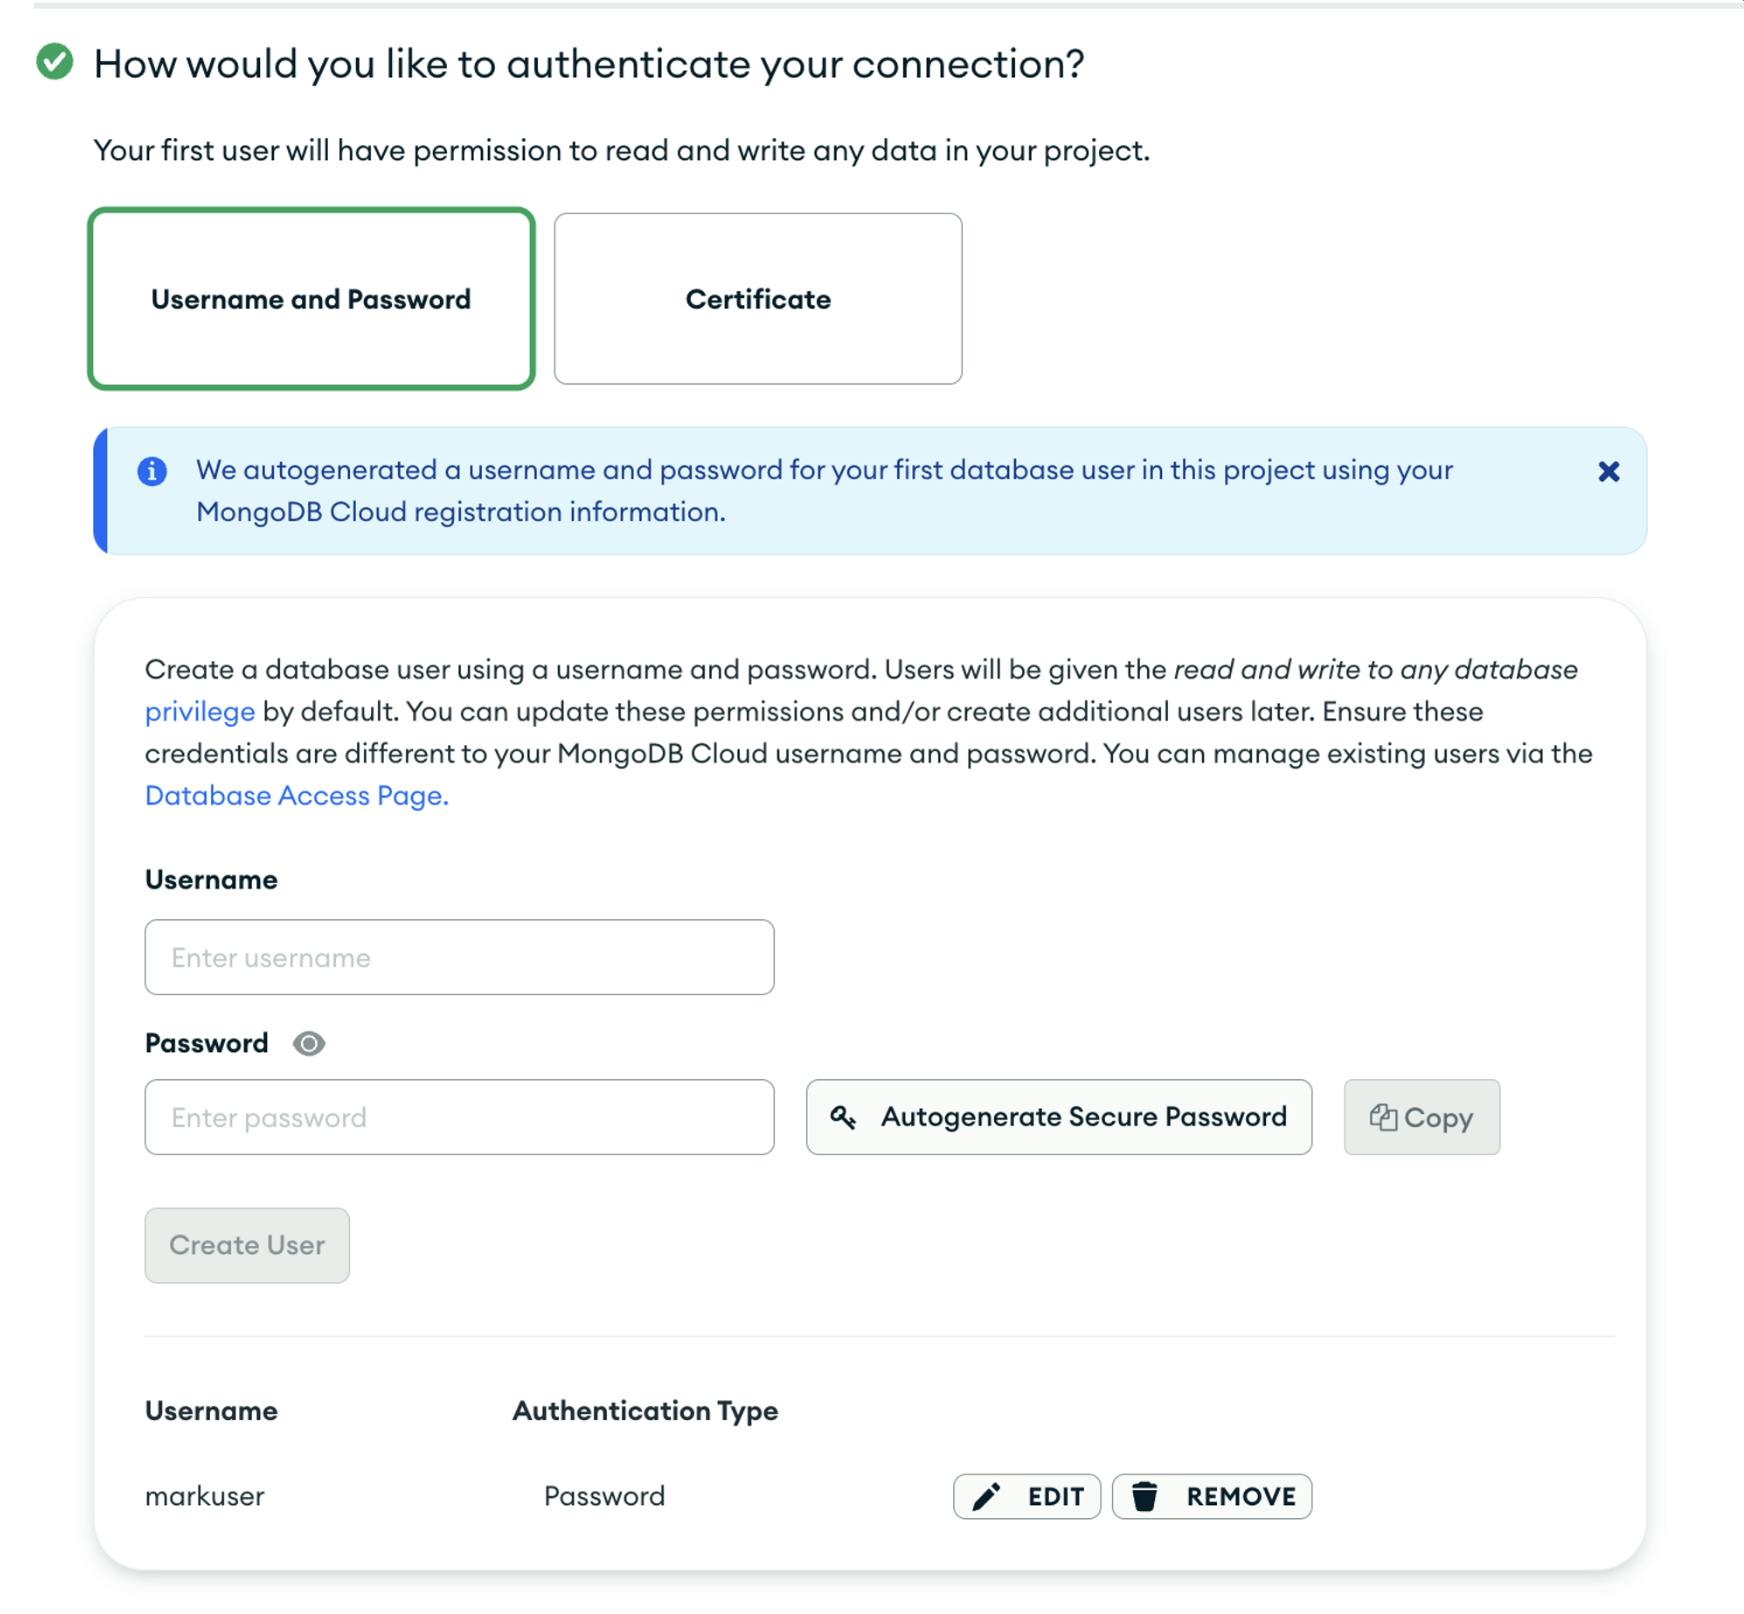
When it comes to setting up our network configuration and security measures, we need to take a few different factors into account. For the purpose of this tutorial, we're going to be exposing our database to users from all over the world, which means we need to configure our IP access list accordingly.
To get started, we'll set the access list to 0.0.0.0/0, which will allow anyone to connect to our database regardless of their IP address. However, if you want to restrict access based on your own machine or server IP.

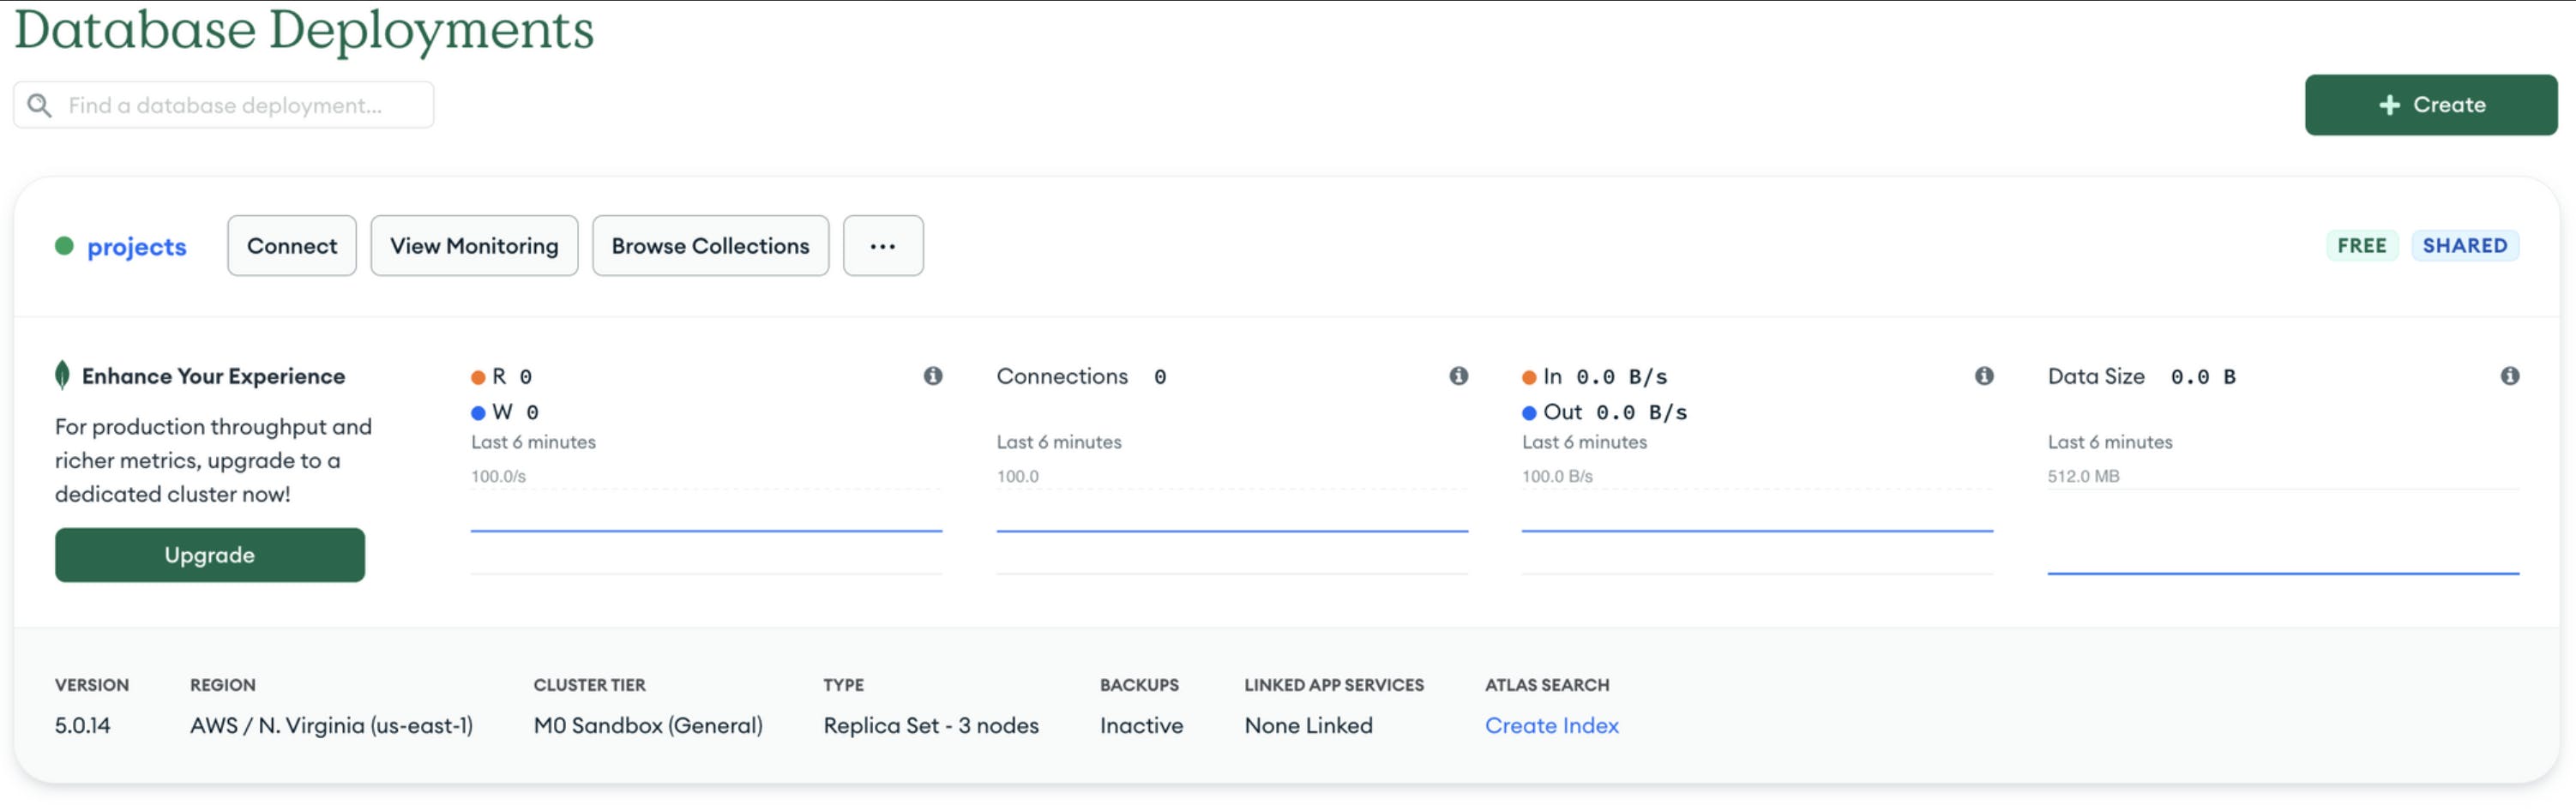
Hooray! Our MongoDB is now set up.
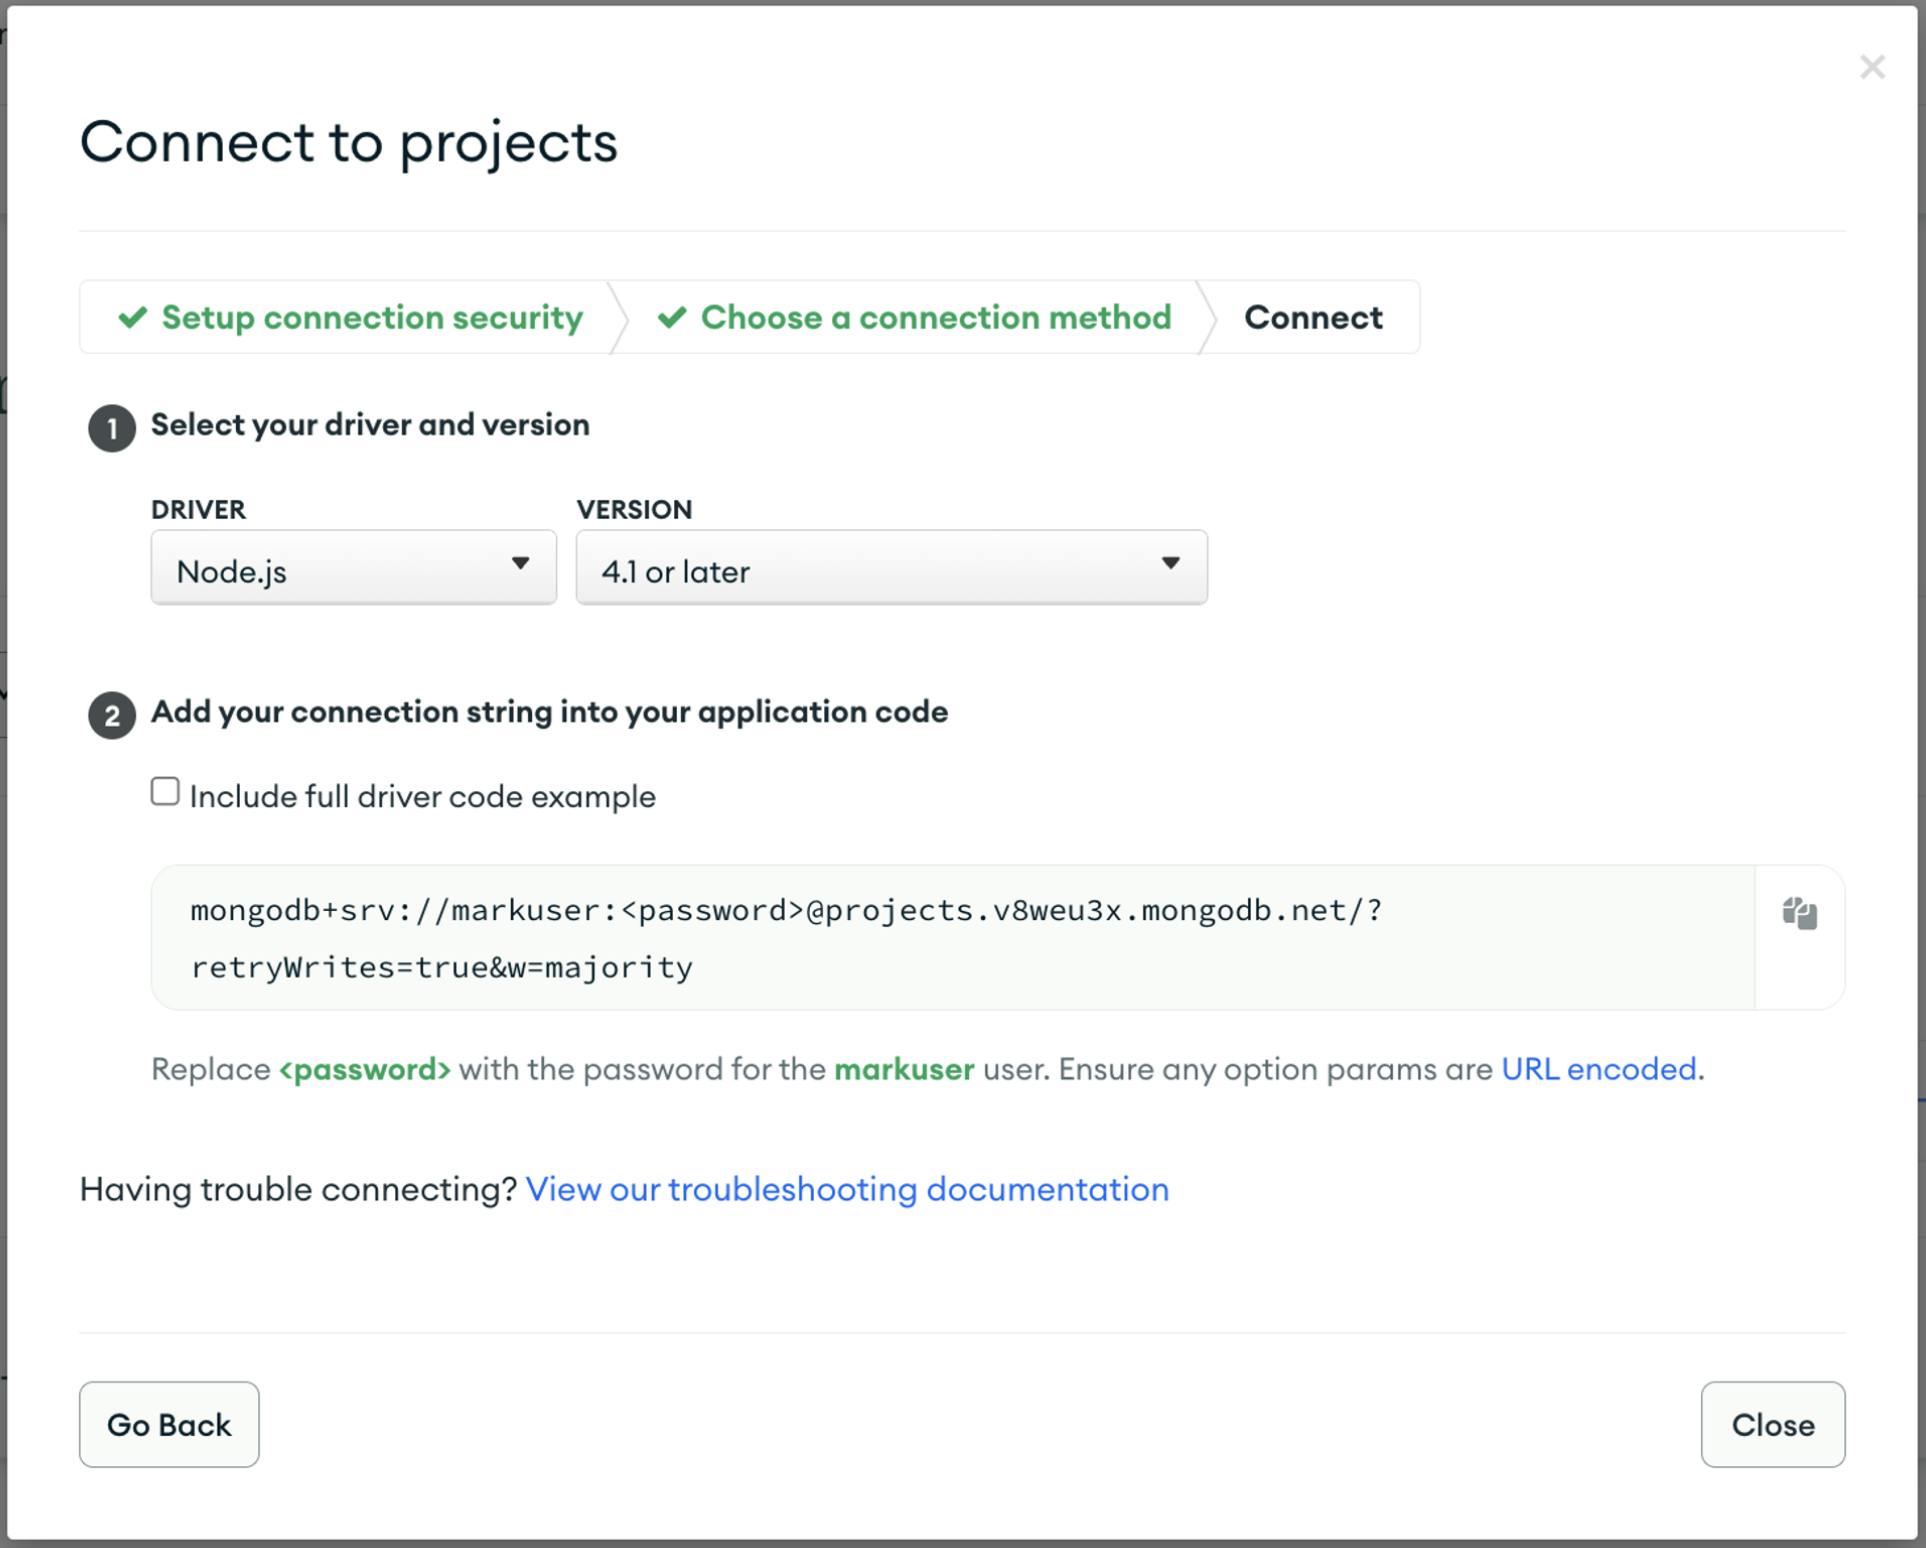
The next step is to get our connection string, which will be used to connect our NestJS project to our database, to do that just click the “Connect” button once the modal appears select “Connection your application”.
Copy the connection string and replace the password with your created password.
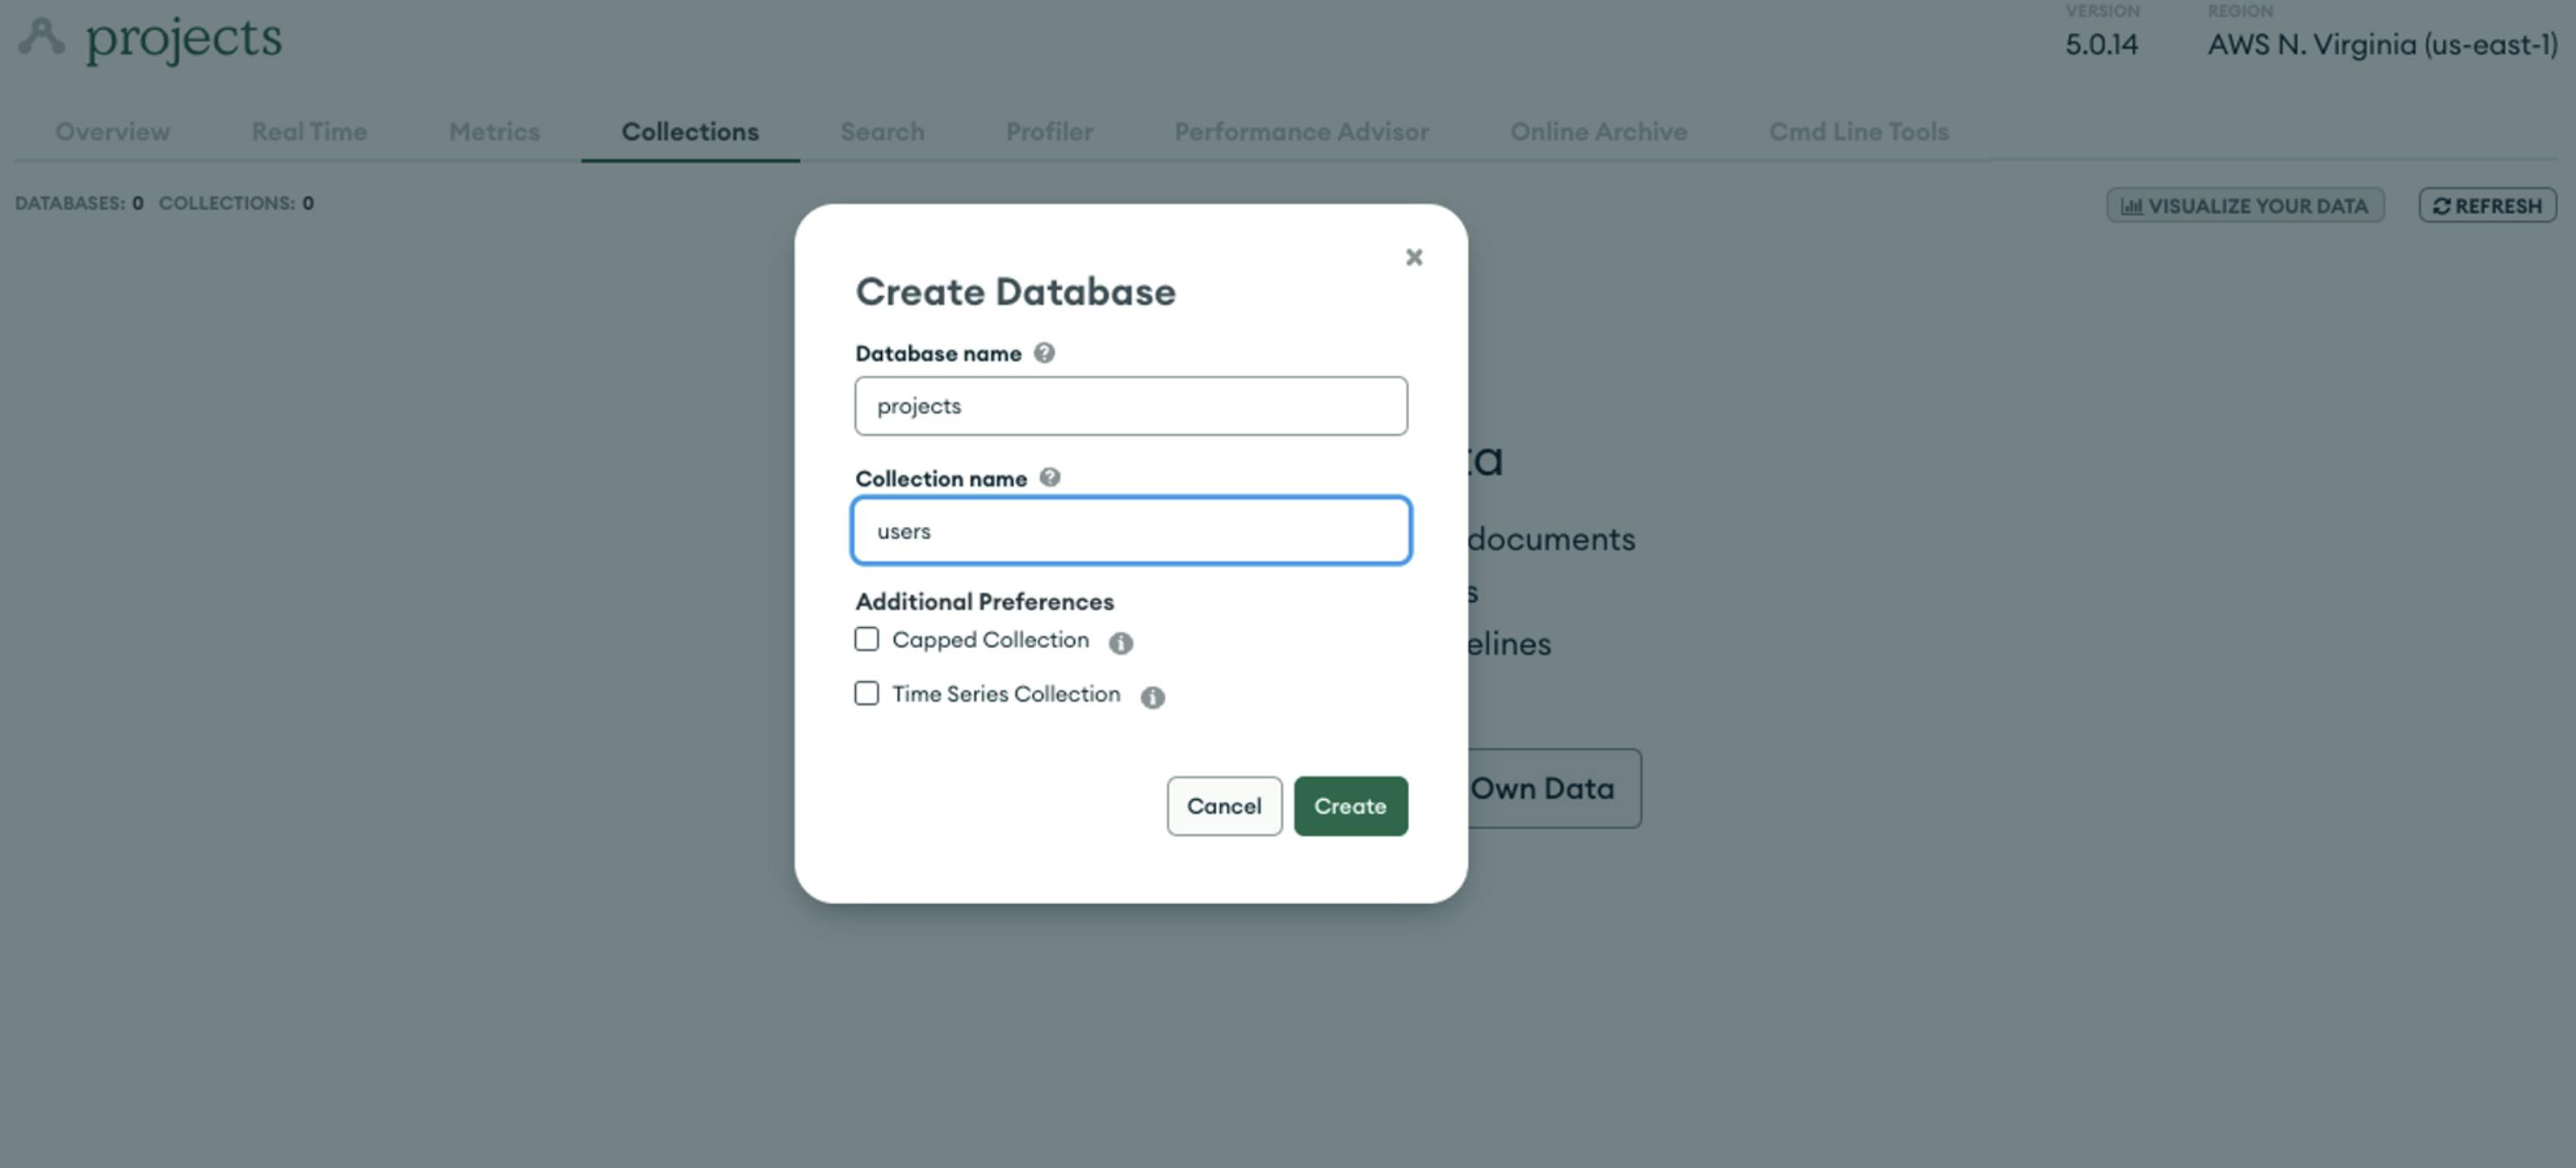
Then click our cluster and create our database “project” and collection name “users”.
Let’s go back to our NestJS Application and start setting up our Mongoose.
To get started, we will need to install the necessary packages for this implementation. Specifically, we will need to install mongoose and nestjs/mongoose. Further details regarding this installation can be found in the following documentation: docs.nestjs.com/techniques/mongodb
$ npm i @nestjs/mongoose mongoose
after installing nestjs/mongoose and mongoose, let’s create our .env file to store our configuration, to do that let’s create it in the rooter folder of our project <app-root>/.env.
.env file contains the connection string for our Atlas database, don’t forget to replace the username and password with your created user.
MONGO_DB_CONNECTION=mongodb+srv://<username>:<password>@projects.v8weu3x.mongodb.net/?retryWrites=true&w=majority
Applications often require different configuration settings depending on the environment in which they are running. For example, local and production environments may require separate database credentials. To ensure correct configuration, it is best practice to store these variables in the environment. This approach helps ensure secure, reliable, and scalable applications across all environments. with that, we can use @nestjs/config you can find more details about this module in the NestJS documentation. https://docs.nestjs.com/techniques/configuration.
To install run:
npm i --save @nestjs/config
Let’s set up our configuration for the ConfigModule on <app-root>/src/app.module.ts file
import { Module } from '@nestjs/common';
import { AppController } from './app.controller';
import { AppService } from './app.service';
import { ConfigModule } from '@nestjs/config';

@Module({
  imports: [
    ConfigModule.forRoot({
      isGlobal: true,
      envFilePath: [`./.env`],
    }),
  ],
  controllers: [AppController],
  providers: [AppService],
})
export class AppModule {}
The ConfigModule.forRoot() method is used to import the configuration module and read the environment variables from a .env file located in the root directory of the application. The isGlobal option makes the module available globally and the envFilePath option specifies the path to the .env file.
Next, we need to connect to our database using @nestjs/mongoose, let’s modify again our app.module.ts files to add the connection configuration.
import { Module } from '@nestjs/common';
import { AppController } from './app.controller';
import { AppService } from './app.service';
import { ConfigModule, ConfigService } from '@nestjs/config';
import { MongooseModule } from '@nestjs/mongoose';

@Module({
  imports: [
    ConfigModule.forRoot({
      isGlobal: true,
      envFilePath: [`./.env`],
    }),
    MongooseModule.forRootAsync({
      imports: [ConfigModule],
      useFactory: (configService: ConfigService) => ({
        uri: configService.get('MONGO_DB_CONNECTION'),
        dbName: configService.get('projects'),
      }),
      inject: [ConfigService],
    }),
  ],
  controllers: [AppController],
  providers: [AppService],
})
export class AppModule {}
The MongooseModule.forRootAsync() method is used to import the Mongoose module and connect it to a MongoDB database. It takes an object with the useFactory property that returns an object with a connection string (uri) and a database name (dbName). It also takes an inject array that specifies which dependencies to inject into the useFactory function.
After completing the configuration and establishing the database connection, we will proceed to implement the repository pattern. To get started, we will create an abstract/base repository class. This can be accomplished by creating a "common" folder and a "database" folder, and then adding an "entity.repository.base.ts" file inside the "database" folder. The "common" folder will contain all of our reusable services/modules, and the "entity.repository.base.ts" file will be located at <app-root>/src/common/database/. We can include the following script in this file to begin the process.
import {
  AggregateOptions,
  Document,
  FilterQuery,
  Model,
  PipelineStage,
  UpdateQuery,
} from 'mongoose';

export abstract class EntityRepository<T extends Document> {
  constructor(protected readonly entityModel: Model<T>) {}

  async findOne(
    entityFilter: FilterQuery<T>,
    projection?: Record<string, unknown>,
  ): Promise<T> {
    return this.entityModel.findOne(entityFilter, { ...projection });
  }

  async find(
    entityFilter: FilterQuery<T>,
    projection?: Record<string, unknown>,
    options?: Record<string, unknown>,
  ): Promise<T[]> {
    return this.entityModel.find(entityFilter, { ...projection }, options);
  }

  async count(entityFilter): Promise<number> {
    return this.entityModel.countDocuments(entityFilter);
  }

  async create(createEntityData: Partial<T>): Promise<T> {
    const entity = new this.entityModel(createEntityData);
    return entity.save();
  }

  async findOneAndUpdate(
    entityFilterQuery: FilterQuery<T>,
    entity: Partial<T>,
  ): Promise<T> {
    return this.entityModel.findOneAndUpdate(entityFilterQuery, entity, {
      new: true,
    });
  }

  async findOneAndUpdateQuery(
    entityFilterQuery: FilterQuery<T>,
    entity: UpdateQuery<T>,
  ): Promise<T> {
    return this.entityModel.findOneAndUpdate(entityFilterQuery, entity, {
      new: true,
    });
  }

  async aggregate(
    pipeline: PipelineStage[],
    options?: AggregateOptions,
  ): Promise<T[]> {
    return this.entityModel.aggregate(pipeline, options);
  }
}
Once we are done setting up our base repository.
let’s generate our users’ module using the nestjs cli.
nest g resource users
? What transport layer do you use? (Use arrow keys)
❯ REST API
  GraphQL (code first)
  GraphQL (schema first)
  Microservice (non-HTTP)
  WebSockets

Would you like to generate CRUD entry points? (Y/n)
CREATE src/users/users.controller.spec.ts (566 bytes)
CREATE src/users/users.controller.ts (894 bytes)
CREATE src/users/users.module.ts (247 bytes)
CREATE src/users/users.service.spec.ts (453 bytes)
CREATE src/users/users.service.ts (609 bytes)
CREATE src/users/dto/create-user.dto.ts (30 bytes)
CREATE src/users/dto/update-user.dto.ts (169 bytes)
CREATE src/users/entities/user.entity.ts (21 bytes)
UPDATE package.json (2068 bytes)
UPDATE src/app.module.ts (793 bytes)
Once we execute it will create entry points for our users’ module, containing all the modules we need for our implementation.
Let’s modify our <app-root>/users/entities/user.entity.ts and add our user schema.
import { Prop, Schema, SchemaFactory } from '@nestjs/mongoose';
import { Document } from 'mongoose';

@Schema()
export class User {
  @Prop()
  email: string;

  @Prop()
  firstname: string;

  @Prop()
  lastname: string;
}

export const UserSchema = SchemaFactory.createForClass(User);
export type UserDocument = User & Document;
we still need to create users.repository.ts file inside src/users that extends to our base repository.
import { Injectable } from '@nestjs/common';
import { InjectModel } from '@nestjs/mongoose';
import { Model } from 'mongoose';
import { EntityRepository } from 'src/common/database/entiry.repository.base';
import { User, UserDocument } from './entities/user.entity';

@Injectable()
export class UsersRepository extends EntityRepository<UserDocument> {
  constructor(
    @InjectModel(User.name)
    projectModel: Model<UserDocument>,
  ) {
    super(projectModel);
  }
}
Next, we will proceed to make changes to our module by adding the UsersRepository as a provider and importing the schema for this specific module. To accomplish this, we will need to modify the users.module.ts file.
import { Module } from '@nestjs/common';
import { UsersService } from './users.service';
import { UsersController } from './users.controller';
import { UsersRepository } from './users.repository';
import { MongooseModule } from '@nestjs/mongoose';
import { User, UserSchema } from './entities/user.entity';

@Module({
  imports: [
    MongooseModule.forFeature([
      {
        name: User.name,
        schema: UserSchema,
      },
    ]),
  ],
  controllers: [UsersController],
  providers: [UsersService, UsersRepository],
})
export class UsersModule {}
Let’s modify our create-user.dto.ts
export class CreateUserDto {
  name: string;
  firstname: string;
  lastname: string;
}
Let’s modify our update-user.dto.ts
import { PartialType } from '@nestjs/mapped-types';
import { CreateUserDto } from './create-user.dto';

export class UpdateUserDto extends PartialType(CreateUserDto) {}
Now let’s modify our user.service.ts file and inject the users’ repository in our constructor.
import { Injectable } from '@nestjs/common';
import { CreateUserDto } from './dto/create-user.dto';
import { UsersRepository } from './users.repository';
import { UpdateUserDto } from './dto/update-user.dto';

@Injectable()
export class UsersService {
  constructor(private readonly usersRepository: UsersRepository) {}

  findOne(
    params: Record<string, unknown> = {},
    projection?: Record<string, unknown>,
  ) {
    return this.usersRepository.findOne(params, projection);
  }

  create(createProjectDto: CreateUserDto) {
    return this.usersRepository.create(createProjectDto);
  }

  findAll(params: Record<string, unknown> = {}) {
    return this.usersRepository.find(params);
  }

  update(id: string, updateProjectDto: UpdateUserDto) {
    return this.usersRepository.findOneAndUpdate(
      {
        _id: id,
      },
      { $set: updateProjectDto },
    );
  }

  remove(id: string) {
    return this.usersRepository.delete({
      _id: id,
    });
  }
}
Let’s modify our users.controller.ts
import {
  Controller,
  Get,
  Post,
  Body,
  Patch,
  Param,
  Delete,
} from '@nestjs/common';
import { UsersService } from './users.service';
import { CreateUserDto } from './dto/create-user.dto';
import { UpdateUserDto } from './dto/update-user.dto';

@Controller('users')
export class UsersController {
  constructor(private readonly usersService: UsersService) {}

  @Post()
  create(@Body() createUserDto: CreateUserDto) {
    return this.usersService.create(createUserDto);
  }

  @Get()
  findAll() {
    return this.usersService.findAll();
  }

  @Get(':id')
  findOne(@Param('id') id: string) {
    const query = { _id: id };
    return this.usersService.findOne(query);
  }

  @Patch(':id')
  update(@Param('id') id: string, @Body() updateUserDto: UpdateUserDto) {
    return this.usersService.update(id, updateUserDto);
  }

  @Delete(':id')
  remove(@Param('id') id: string) {
    return this.usersService.remove(id);
  }
}
Once we are done setting up everything let’s test our endpoint using Postman.
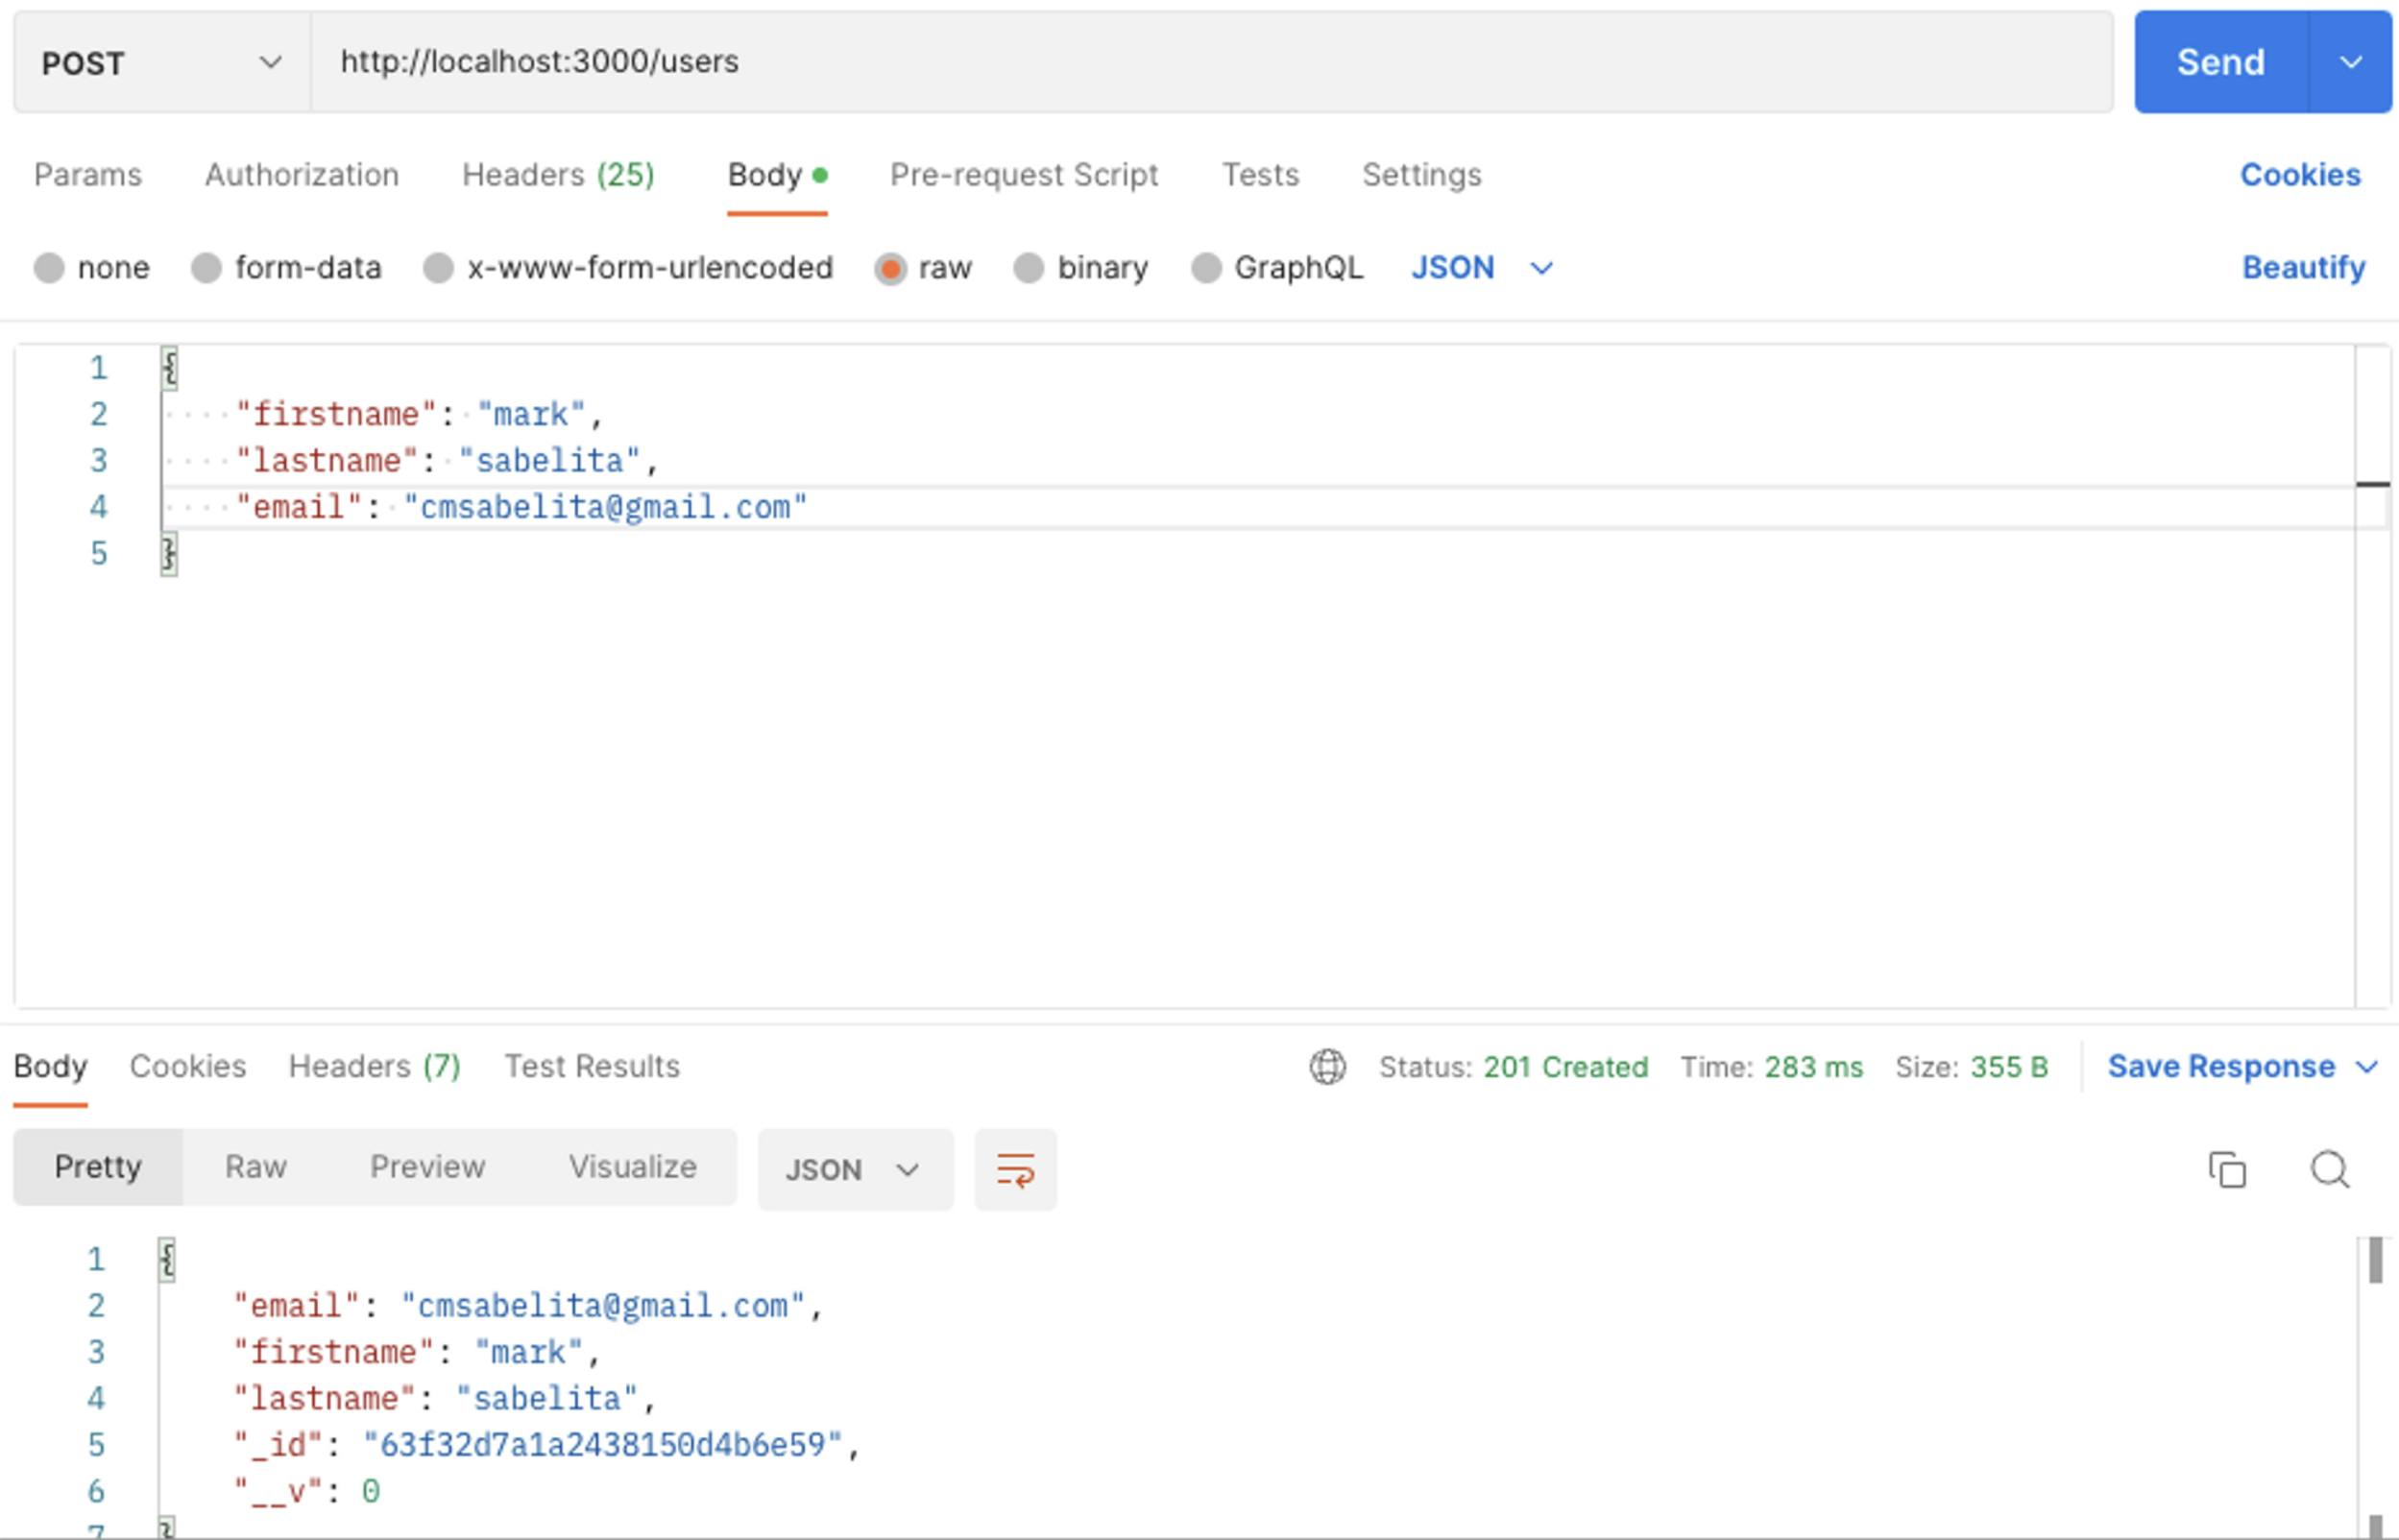
Testing our create user endpoint: POST - localhost:3000/users
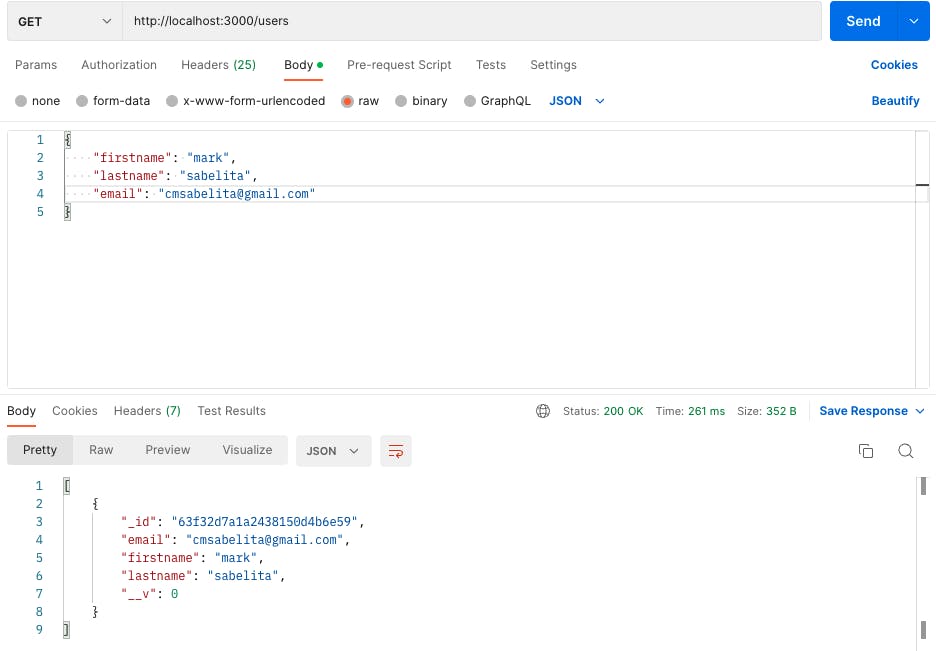
Testing our get-all users endpoint:
GET ALL - http://localhost:3000/users
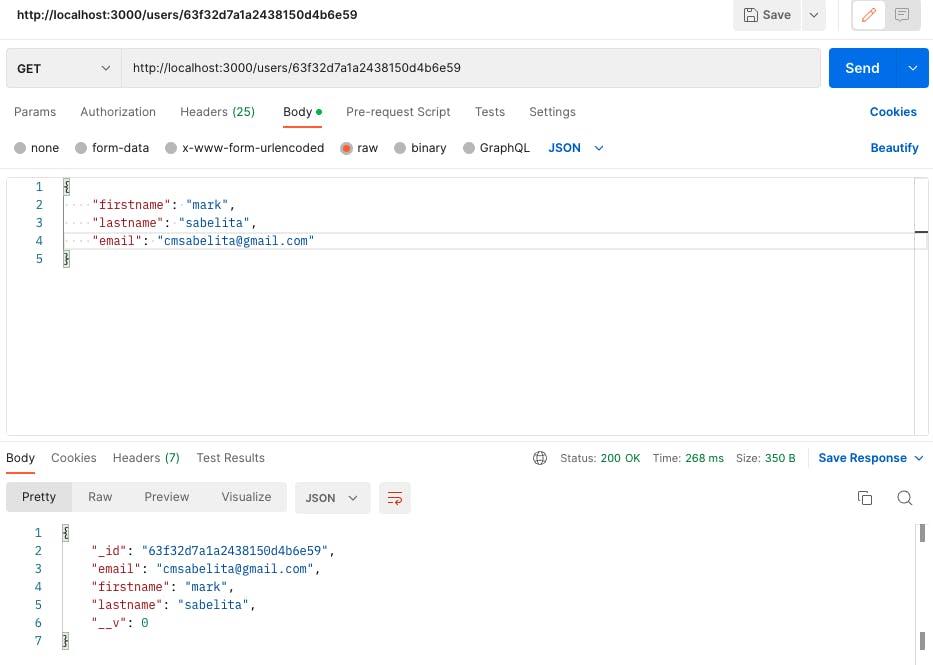
Testing our get user endpoint: GET USER - localhost:3000/users{id}
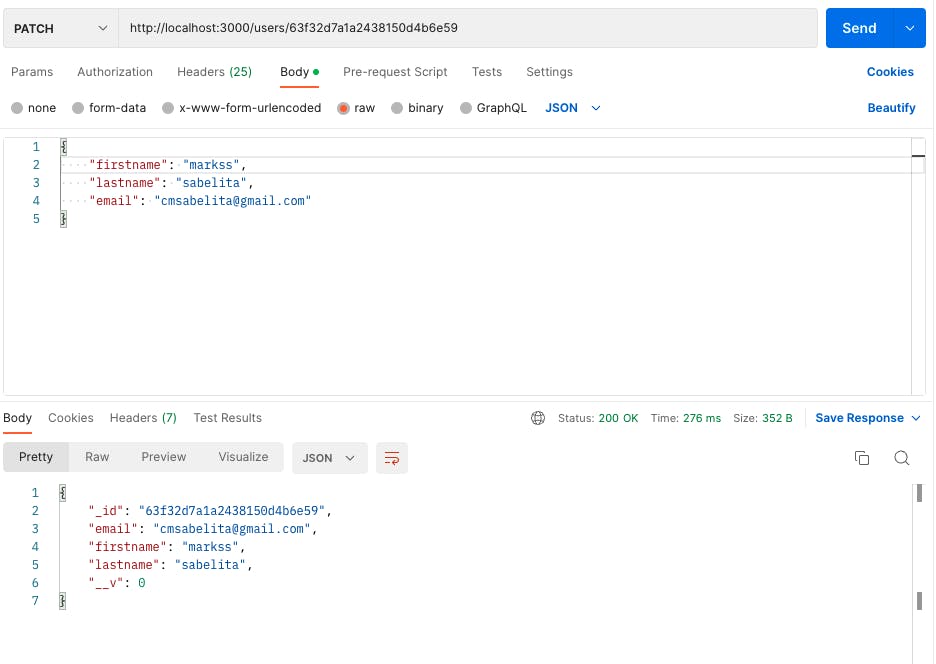
Testing our update user endpoint: PATCH USER - localhost:3000/users{id}
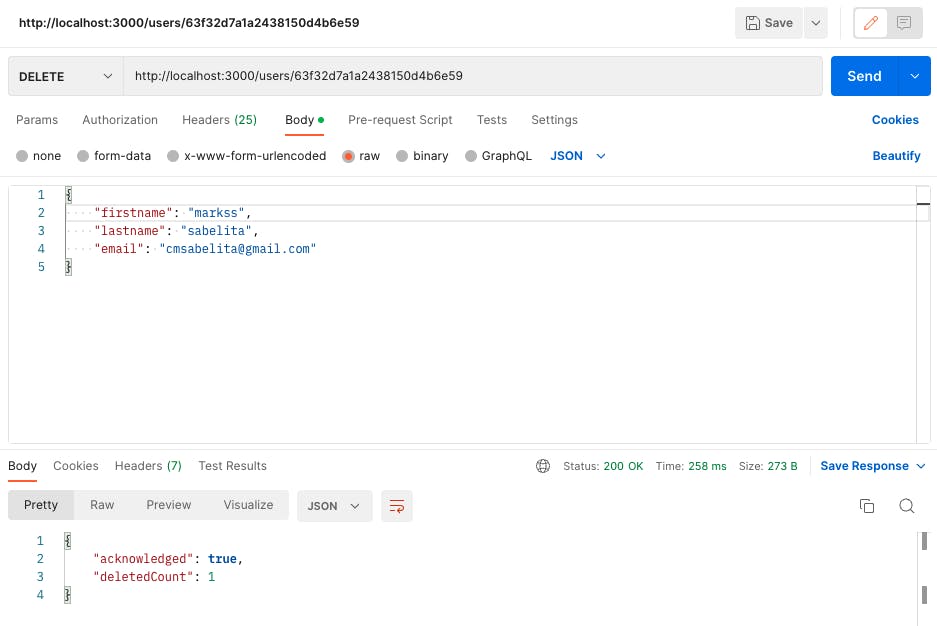
Testing our delete user endpoint: DELETE USER - localhost:3000/users{id}
Finally! we are done setting up our project let’s Dockerize our application now.
Setting up our Docker configurations
Once we are done setting up our NestJS project we need to start working on setting up our docker configuration file.
To start with create a Docker file in the root folder <app-root>/Dockerfile and add this configuration.
FROM node:18-alpine As development

WORKDIR /usr/src/app

COPY package*.json ./

RUN npm install

COPY . .

RUN npm run build

FROM node:18-alpine as production

ARG NODE_ENV=production
ENV NODE_ENV=${NODE_ENV}

WORKDIR /usr/src/app

COPY package*.json ./

RUN npm install --only=production

COPY . .

COPY --from=development /usr/src/app/dist ./dist

EXPOSE 3000

# Start the server using the production build
CMD [ "node", "dist/main.js" ]
The first part of the Docker file is the "BUILD PHASE". In this phase, we create a container using the node:18-alpine image as a base, and we set our working directory to /usr/src/app. We then copy the package*.json files into the container and run npm install to install all the dependencies required for our project. We then copy over the rest of the files into the container and run npm run build to build the project. At the end of this phase, we have a new container that has our application built and ready.
The second part of the Docker file is the "RUN-TIME PHASE". In this phase, we create a new container using the node:18-alpine image as a base, and we set our working directory to /usr/src/app. We then copy over the package*.json files into the container and run npm install --only=production to install only the dependencies required to run our project in production. We then copy over the rest of the files into the container and copy the dist folder from the container created in the BUILD PHASE to the dist folder in the new container. We then tell the container to listen on port 3000 and start the server using the production build.
Finally, when we run the container, we can access the server on port 3000.
To test and run our application we can run:
docker build . --tag "project-name"
To check our built image:
$ docker images
REPOSITORY      TAG          IMAGE ID       CREATED          SIZE
project-name    latest       7ca97e07278b   14 minutes ago   361MB
To run our application in port 80, lets run
$ docker run -d -p80:3000 project-name
506cd2cd5a4825e3019d7b4f8a773d6ddefa8c4be18b9e2f03b96e85759cae90
Now let’s check our application on our browser using localhost/users.
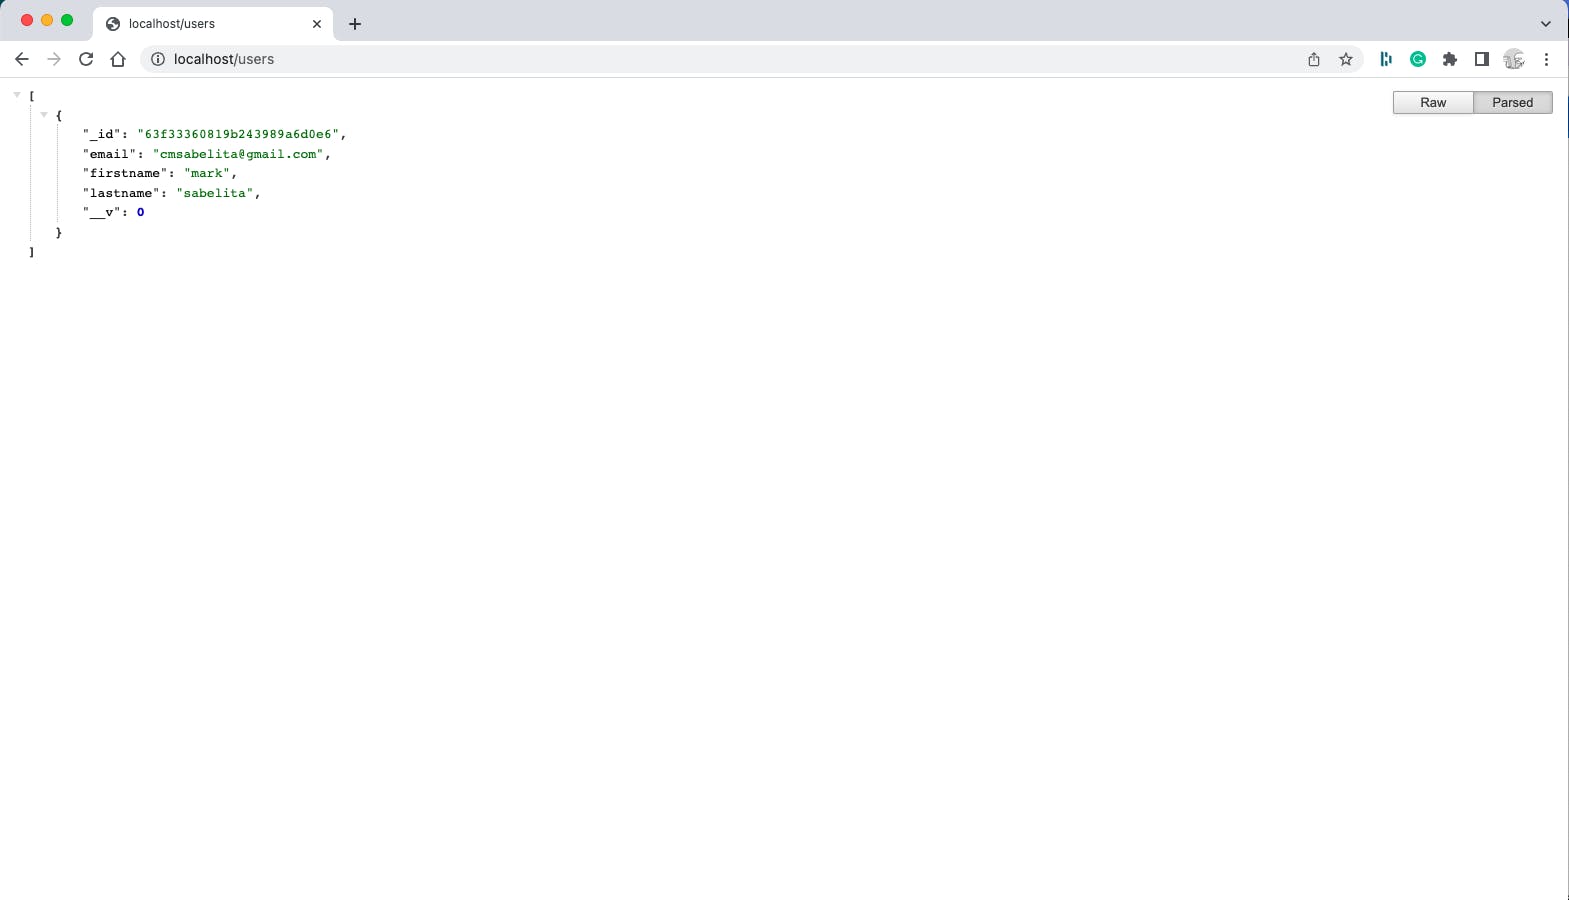
We have successfully launched our application on port 80. The complete source code of this application is readily accessible in the corresponding repository.
https://github.com/marksabelita/nestjs-docker-mongodb-mongoose
For those seeking to explore the deployment of this application on AWS Fargate through AWS Copilot check this blog post.
https://marksabelita.hashnode.dev/deploying-nestjs-application-on-ecs-fargate-using-aws-copilot